Sally Hansen Swatches: Sugar and Fuzzy Coats

I wanted to share a few swatches of some new textured nail polish I tried by Sally Hansen. I received 2 of the Sugar Coat polishes and 1 of the Fuzzy Coat polishes.

Image

  • Sugar Coat Polish-limited edition

Candy for your nails! This special effect nail polish includes rich, sweet colors that dry to a surprising matte finish with a sugary 3D effect.

Image

Spare-A-Mint-Deep Teal color. I used 2 coats for the swatches. No top coat.

ImageImageImageImage

Image

Cotton Candies-Bright bubblegum pink. I used 2 coats for the swatches and no top coat.

ImageImageImage

Image

Thoughts-I really liked these Sugar coat polishes. They applied super easily and dried quick. They apply pretty smooth and the texture appears as they dry. I would like more of these.

  • Fuzzy Coat Polish

The ultimate outfit for your nails! Sally Hansen continues to lead the nail category with new 3D, unique textures inspired by fashion. Fuzzy Coat transforms nails with a 3D textured, woven fiber effect.

Image

Wool-lite-Light pink bars in a clear base. I used 3 coats over a white undie for the swatches.

ImageImageImageImage

Thoughts-application was pretty easy. The polish went on smoothly, but I feel like it doesn’t really look like the advertisements for this polish. It’s hard to get it to look as “fuzzy” as it does on Sally Hansen’s website.

Overall-I LOVED the sugar coat polishes, but I wasn’t as crazy about the fuzzy coat polish. Application for both was smooth and easy. The overall look and ease of drying time make the Sugar Coat polish my favorite.

Do you own any of these? If so what are your thoughts?

DE46853BF799E046593CF3DC75EFEEC7

*disclaimer-I received these from SH free to review. My opinions are 100% honest and reflect my personal experience with the polish.

Press Release: Zoya PixieDust Fall 2013 Collection

Image


The best-selling, revolutionary matte, textured, sparkling Zoya PixieDustTM formula returns for Fall with six spot-on trend colors for the season.

ZOYA PIXIEDUST – FALL EDITION

ZP698 – Tomoko: Glowing Silver. Exclusive Zoya PixieDustTM – Textured Matte Sparkle formula.
ZP699 – Chita: Emerald Green. Exclusive Zoya PixieDustTM – Textured Matte Sparkle formula.
ZP700 – Sunshine: Van Gogh Blue Exclusive Zoya PixieDustTM – Textured Matte Sparkle formula.
ZP701 – Carter: Regal Purple. Exclusive Zoya PixieDustTM – Textured Matte Sparkle formula.
ZP702 – Arabella: Rich Fuchsia. Exclusive Zoya PixieDustTM – Textured Matte Sparkle formula.
ZP703 – Dhara: Dazzling Copper. Exclusive Zoya PixieDustTM – Textured Matte Sparkle formula.
 
Ultra long-wearing, nail lacquers by Zoya are BIG5FREE – all formulas are completely free of harmful industrial chemicals such as toluene, camphor, formaldehyde, formaldehyde resin and dibutyl phthalate (DBP) that are known to cause cancer and birth defects.

 
PixieDust Application:
For BEST RESULTS apply 1-3 (for full coverage) thin coats of polish. Allow product to dry completely for full effect. No base coat and top coat required. Zoya Get Even base coat can be used if desired.Find over 300 stunning Zoya colors on www.zoya.com. Each and every color has a name as unique as the women who inspired it.
 
ZOYA IS THE NEW COLOR OF FASHION!
Zoya PixieDust
TM
$9.00 ea. (US) Available on Zoya.com

Image

 
FALL COLOR ARRIVING SUPER DUPER SOON…

Zoya: My Earth Day Promo Colors

I know this was awhile ago, but I am just getting around to posting the colors I got from the Zoya Earth Day Promo. I got 6 colors for $24 so half price!

Image


Image

Zoya Sam

Image

Zoya Neely

Image

Zoya Envy

Image

Zoya Janice

Image

Zoya Opal

Image

Zoya Zuza

Took me forever to pick out which I wanted AND I got a lot of reds and green for some reason 🙂 I am so excited to try these!

Zoya: Chyna Pixie Dust

My love affair with Zoya started when I was in pharmacy school. I could often been seen stepping out of morning rounds in the trauma unit  to chat with the nurses about polish. Somehow I still made an A- on that rotation.

Zoya is one of my favorite brands for multiple reasons, one being the amazing formula. When I saw the “Pixie Dust” collection I almost fainted. No joke. Believe it or not I just tried my first ever Zoya Pixie Dust polish in Chyna.

Image

Chyna is a dark red with small red glitter. It dries matte, but still sparkles and is slightly textured. I am IN LOVE WITH IT. What is about to follow is an unreasonable amount of swatch photos. I couldn’t choose just 2-3 pics so I just put them all up.

ImageImageImageImageImageImageImage

You may notice my poor index finger is a nub. This was the result of an unfortunate accident in which I do not remember. I couldn’t bare to cut the rest down.

Also for Ipsters…don’t forget about this month’s promo for Zoya Nail polish which can be found in this month’s bag!! This code works for all Zoya polishes, even the pixie dust polishes!

Zoya and Ipsy have created a special promotion just for the nail polish addict that has to have the latest and greatest. From May 1, 2013 – May 31, 2013 Ipsters using the code IPSYZ will get the following special offer:

Special Purchase:       Buy any 2 Zoya Polishes Get 1 Free (no limit)

Special Shipping:         $5 Shipping ( reg. $6.95 or Free with purchase over $50) 

Special Free Product:  1oz Zoya Remove

Thanks to Zadidoll for posting this promo!

Hard Candy: Pink Taffy

I got this at Walmart yesterday because the color reminded me of cupcake frosting with sprinkles and I was hungry. Hmmm. I have read mixed reviews about the new line of Hard Candy polishes, but for 4 dollars I decided to take the plunge. Application was decent, although a little thick. 

Image

Hard Candy Pink Taffy

This polish sports a cream base with suspended matte white and navy glitter, and shiny pink glitter. It looks good enough to eat. These pictures are all only 1 coat!! I swear! I was running late and 1 coat looked pretty so I left it. I used Seche Vite top coat.

Image

Hard Candy Pink Taffy

Image

Hard Candy Pink Taffy

ZOYA Earth Day Nail Polish Exchange is ON!!

Image


Basically, you can get 6-24 nail polishes for 50% off excluding the pixie polishes (bummer). You can send back the same amount of polishes you bought, or none at all, I don’t think they really keep track of it. I took advantage of this last year, but I just can’t justify it this year, I have gotten SOOO much nail polish lately, including the entire Zoya Pixie summer collection. I copied this from Zoya’s blog:


“The Zoya Nail Polish Exchange* is BACK for Earth Day 2013!


Once again, Zoya is helping you do a little spring cleaning with the return of the Earth Day Zoya Nail Polish Exchange* for 2013. Clean out your nail polish wardrobe and get rid of old nail polish that may not be BIG5FREE(Free of Formaldehyde, Formaldehyde Resin, Toluene, DBP and Camphor) and exchange it for a greener alternative – long lasting, award winning, healthy ZOYA Nail Polish Bottles!

  1. Go to Zoya.com and pick out the polishes you would like (Note: ALL Zoya PixieDust Collection shades are excluded) and add them to your cart. You must select at least 6 bottles and no more than 24 bottles of polish (Salon accounts minimum 12 maximum 48 bottles).
  2. Apply the code: ZOYAEARTH2013
  3. Your order value will be adjusted to reflect a 50% discount (we use these funds to properly dispose of the old nail polish).
  4. SUBMIT your order!

Then Zoya will ship out your NEW polish! YEAH! 
Once you get your order, here is where the exchanging* happens…

  1. Ship back the equivalent number of bottles you received to the return address below (ie. If you got 6 bottles of Zoya – you would send us 6 NON-ZOYA polishes). Please check with your carrier on the proper way to ship nail polish.
  2. Include a copy of your order.  

To clarify the exchange: You do not have to send us the exact amount of bottles that you are ordering. You can send any quantity up to that amount. You can also donate. If you decide you don’t want to do either, it’s ok “Offer is not contingent on customer returning polish” – we will still love you and will ship the Zoya polishes… we’ll just send you on a guilt trip for a while 🙂

Ship Your Old Nail Polish To:
 

Art of Beauty, Inc.
c/o Polish Exchange
5060 Taylor Rd, Unit D
Cleveland, Ohio, 44128, USA

Once we receive your polish we do the rest! It’s that simple!


IMPORTANT!

The bottles you send in cannot be Zoya, Qtica or Nocti polishes (but they can be any other brand).

We are using the honor code here folks! We want to make sure you get your Zoya Nail Polish! We send you the polish first then you send your old polish back to us! If you do choose to send us your old polish we promise to properly dispose of it according to EPA guidelines. This offer is only good for 1 week so hurry – Don’t Wait!”

Will you be taking advantage of this great offer??

Image


Sally Hansen Salon Insta-Gel Strips Review

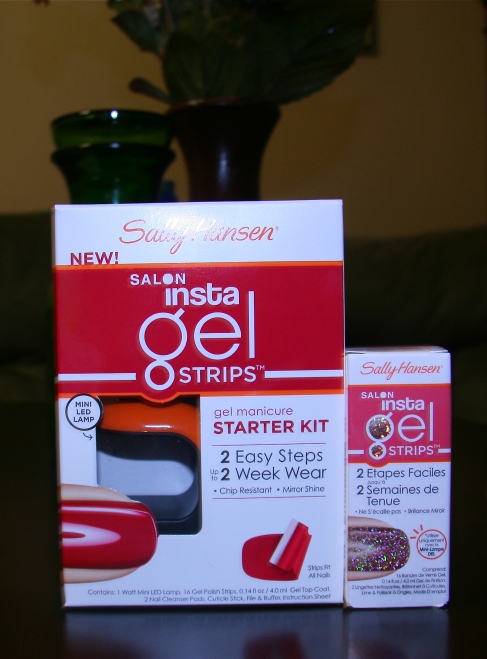
Recently I was lucky enough to be chosen to test this new gel nail system by Sally Hansen. This system is like their other gel nail polish system, but uses polish strips instead of loose gel polish. My box arrived with the starter kit containing the color strips in Red my Lips, a very nice red. The starter kit also includes the mini LED lamp, the gel top coat, nail cleanser pads, cuticle stick, file and buffer. I am aware this product has less than stellar reviews on Sally Hansen’s website, but I am going to give an honest review and not let the other reviews influence me whatsoever. Luckily I applied the polish before reading the reviews, so I feel my opinion and review will be unbiased.

Image

What I got

Image

The contents of the starter kit

I am going to go through the application process step by step. I would recommend having some music to listen to, possibly a drink, and plenty of space to work. I have a large bathroom vanity and chose to apply the nails there. You also need a plug for the LED light. I went ahead and plugged in the LED light and had it ready to use. It also may be convenient to have a small trash can near. I printed the instruction sheet from Sally Hansen’s website because I hate reading those huge white instruction sheets that are folded into like 100 million folds. Be comfortable before starting, it’ll make the application process less frustrating if you have everything you need.

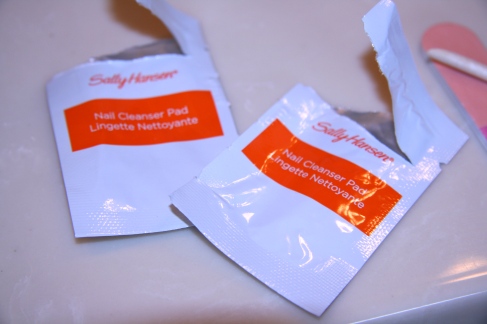
Step 1: Remove any old nail polish, then use the included cuticle pusher to push cuticles back. The wooden cuticle stick hurt me so I used my thumbnail to push back my cuticles. I’ve been doing this forever though and it works great for me! Next use the file to shape nails, and use the white buffer side to buff the nails. It would be a good idea to wash your hands with warm water at this point. You’ll need warm hands when applying the strips. Next, use ONE of the included nail cleanser pads to wipe each nail REALLY WELL. I mistakenly thought I was supposed to use one pad for each hand, but you will need the other cleanser pad for later so don’t use both! You have to do this part fast because I think they are essentially alcohol pads, and alcohol evaporates quickly and the pad dries out really fast. It’s super important to remove any trace of oil off the nail surface or the gel strips won’t stick right and they’ll peel later on.

Image

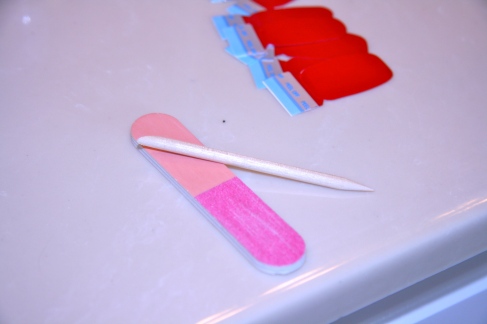
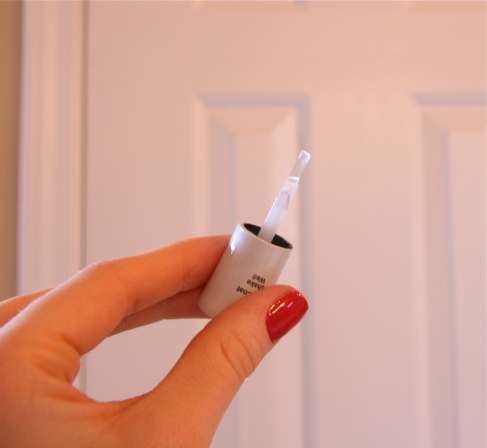
Included file and cuticle stick.

Image

2. It’s time to apply the strips! This was the hardest part for me. The kit comes with 16 strips in different sizes. Start with your pinky and do your thumb last. Finish one hand before moving on to the other. If you have ever applied nail stickers or regular nail polish strips, the application is the same. Find a suitable size for your nail and remove the plastic from the front of the polish strip. Next, remove the white paper from the back and apply the strip onto your nail. It’s best to work with warm hands to make the polish strip pliable. Once it’s in place, stretch and fold the excess over the nail edge and use the smooth side of the file to file it off. Use your finger to repeatedly press and smooth the polish strip onto your nail. It’s important none of the polish is applied over your cuticle or skin. It won’t stick right and will peel off later. This is where you may need the trash can. The plastic and paper backings and excess polish went everywhere. The plastic also wanted to stick to my fingers maybe from static? It was mildly frustrating. Another mildly frustrating aspect of this step was my polish strips wrinkled a bit. I was able to smooth most of it out though, so not a deal breaker, but something to prepare for.

Image

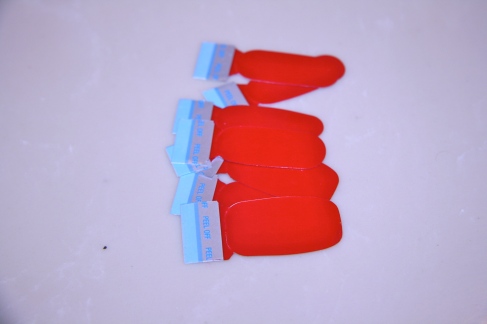
Gel Polish strips in Red my Lips

Image

Right before filing off the excess polish

Image

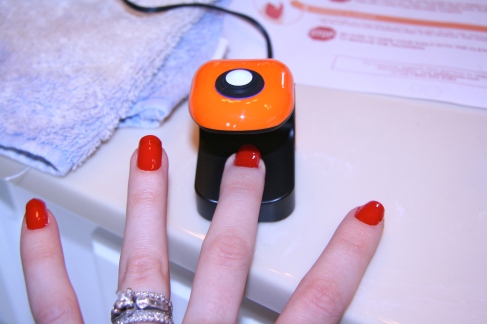
After applying the gel polish strips

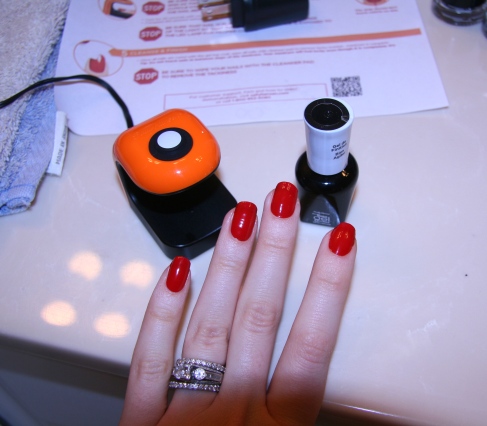
3. This is the easy part, for me anyway. Shake the gel topcoat up really well and apply a very thin coat to your pinky. You can’t apply it very thick or get any on your skin or cuticle. This could be frustrating if you’re not used to applying nail polish, but I apply it so much I’m pretty good at not getting any on my cuticles. Once you apply the topcoat, place your pinky flat on the LED light and turn it on. The button is on top. It turns off automatically after 30 seconds. Then move on to your next finger, saving your thumb for last. Then do the other hand. The topcoat cures in 30 seconds, but still felt kind of tacky. This is normal. After all your fingers are cured, use the other cleanser pad to wipe the tacky residue off each nail. Then you’re done!

Image

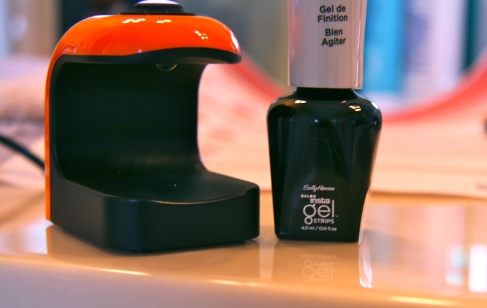
The LED light and topcoat

Image

The topcoat brush. Reminded me of OPI’s topcoat brush but smaller.
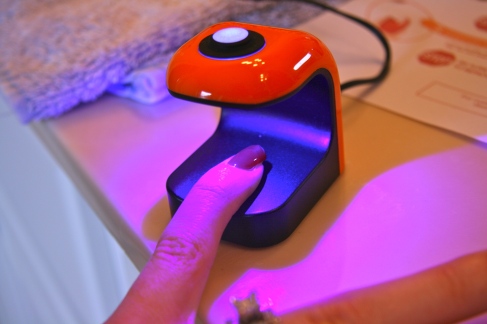
Image

Curing!

Image

 Image

Image

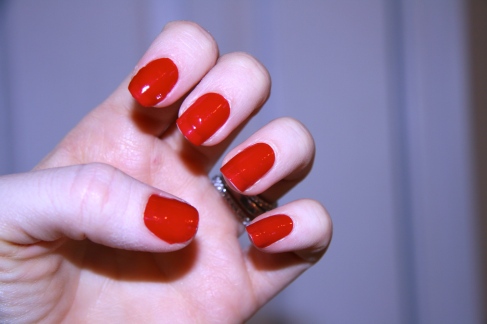
Finished, natural light

Image

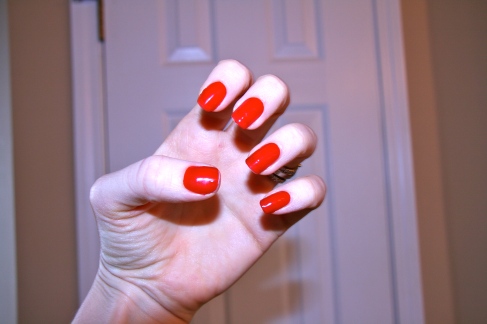
Finished, with flash
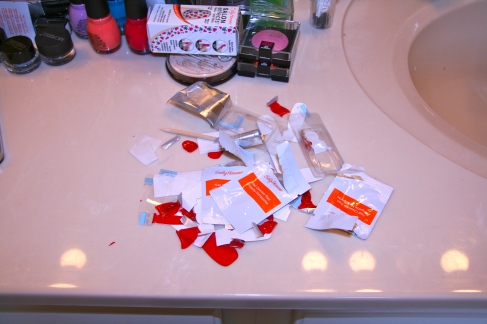
Image

The aftermath!

Final Verdict: I feel that if you take your time and follow the directions very carefully this can work. I thought my finished nails looked really nice. There were some frustrating aspects of the application, but to me it was worth it. I’ve had them on 24 hours and so far no peeling.

UPDATE: I removed the strips after one week, and I felt the removal process wasn’t that bad. I simply soaked my nails in an acetone based polish for 10 minutes and the gel came off easily. I do recommend a good moisturizer for afterwards though, since acetone is so drying. I think the foil method would also work for removal.


Have you tried these? Thoughts?